Plaid End-Grain Cutting Board
A tartan-plaid end-grain chopping board in three woods — cherry, walnut and brown maple — with full-bleed brown-maple long edges (no contrasting frame). The plaid you see is the end grain of the wood (like looking at the top of a bundle of straws), which is the premium chopping surface: gentle on knives, and it hides cuts because the blade parts the fibers instead of slicing them.
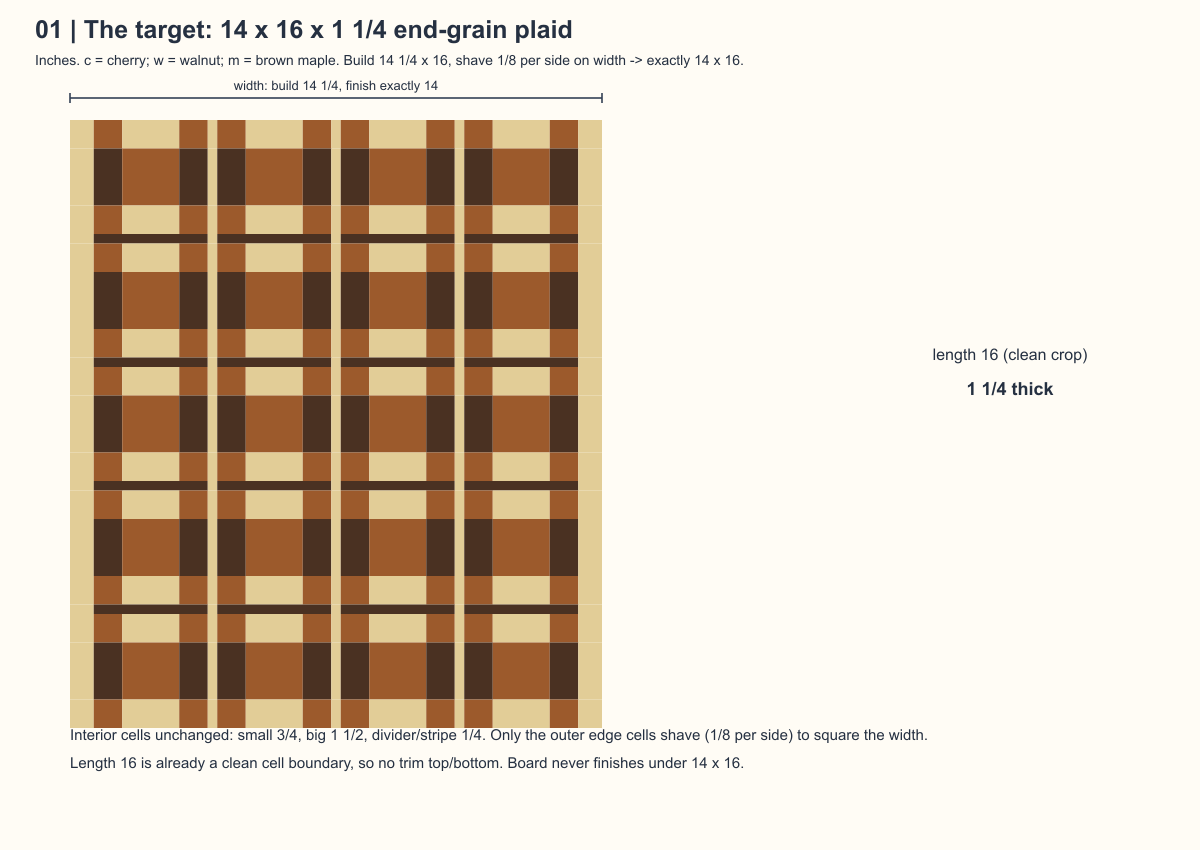
- Finished size: exactly 14 × 16 × 1¼ inches (built at 14¼ × 16, then a light ⅛-per-side width cleanup; the board never finishes under 14 × 16).
- Woods: cherry, walnut, brown maple.
- Build family: laminate long-grain panels → crosscut into slices → turn end-grain up → mirror two halves → glue → flatten → finish.
- Skill level: partially-experienced hobbyist. If you have glued a panel before, you can do this.
Why this plan is trustworthy: the design was checked against established practice, including The Wood Whisperer's explanation of why end-grain boards crack — and it deliberately makes every stripe end grain so the whole board moves together. Tool limits come from the actual DeWalt, Kreg and Titebond manuals. Nothing here claims to be a substitute for your own test cuts.
The one idea that makes it work
You don't carve tiny squares. You glue up a few long striped boards ("panels"), saw them into slices like a loaf of bread, and tip each slice up on end. The stripes you glued become the plaid grid, now showing end grain. Build two mirrored halves (each ~7⅛" wide so it fits a lunchbox planer and a track saw safely) and join them down the middle through the centre maple divider.
The simplified design (all 4/4 stock)
Everything is milled from 4/4 S3S lumber (surfaced ~13/16") on a lunchbox planer. There are only three panel types:
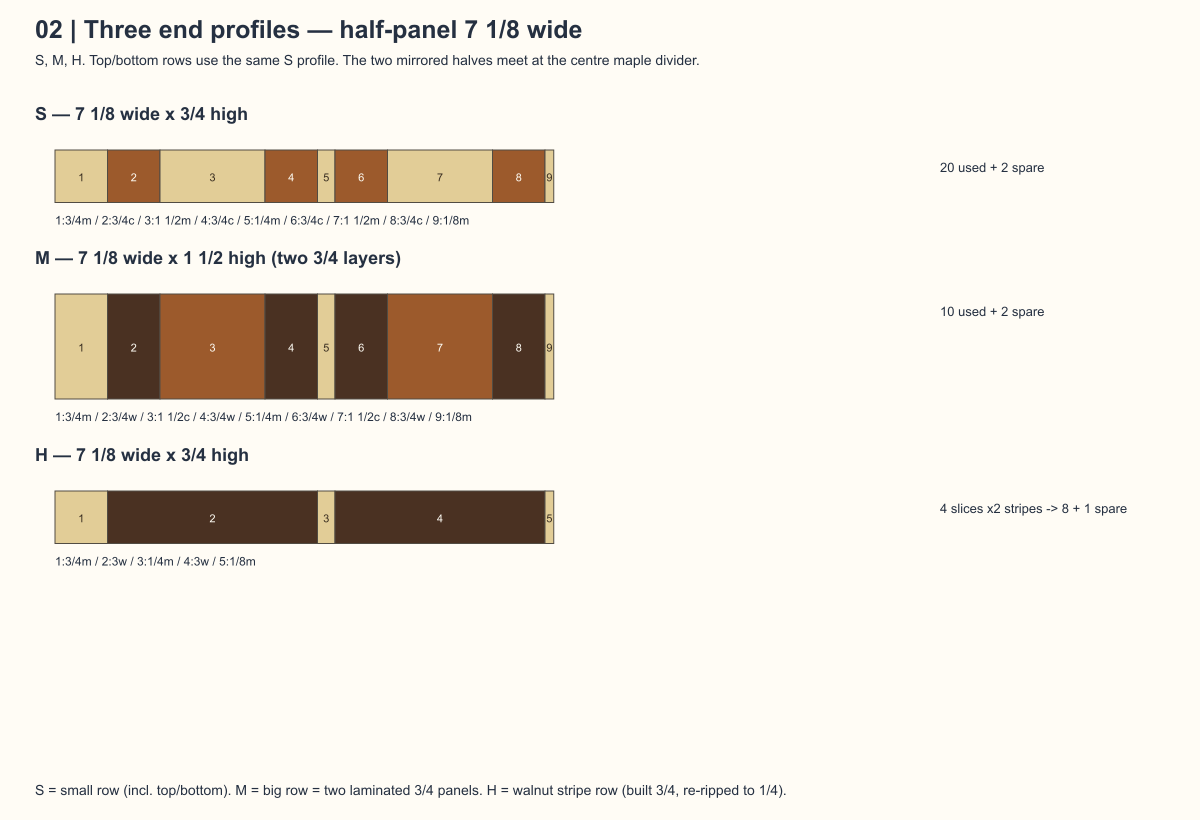
- S — every small row (including top and bottom), 7⅛ wide × ¾ high.
- M — the big-square rows, 7⅛ wide × 1½ high, made by gluing two ¾" layers (so no thick stock is required).
- H — the thin walnut lines, built at the normal ¾" height and re-ripped into two ¼" end-grain stripes per slice — never planed thin (that wastes wood and is dangerous).
From rough board to panels
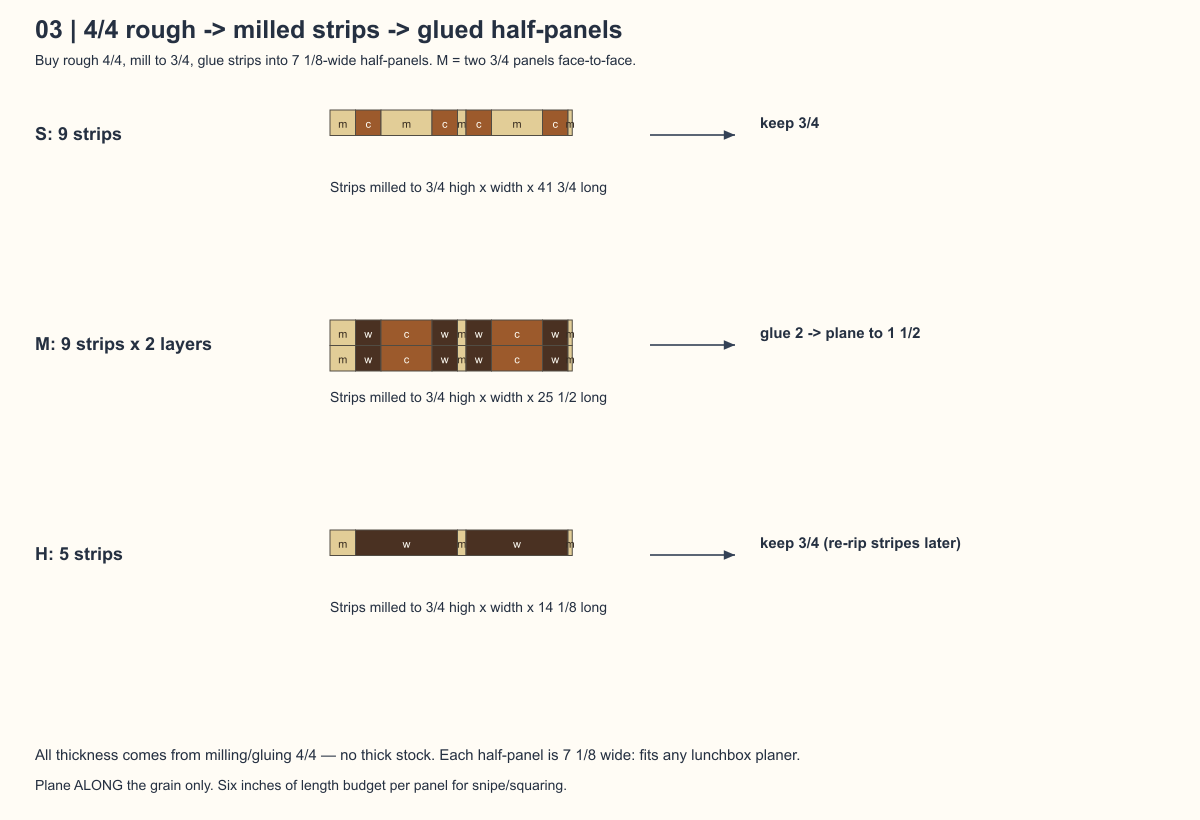
Mill the S3S 13/16" boards down to ¾", rip strips, and glue them into 7⅛"-wide half-panels. The big (M) rows are two ¾" panels glued face-to-face — the same lamination you'd use for any thick part. The planer only ever touches long-grain panels, never the finished end-grain board.
Crosscut, then turn
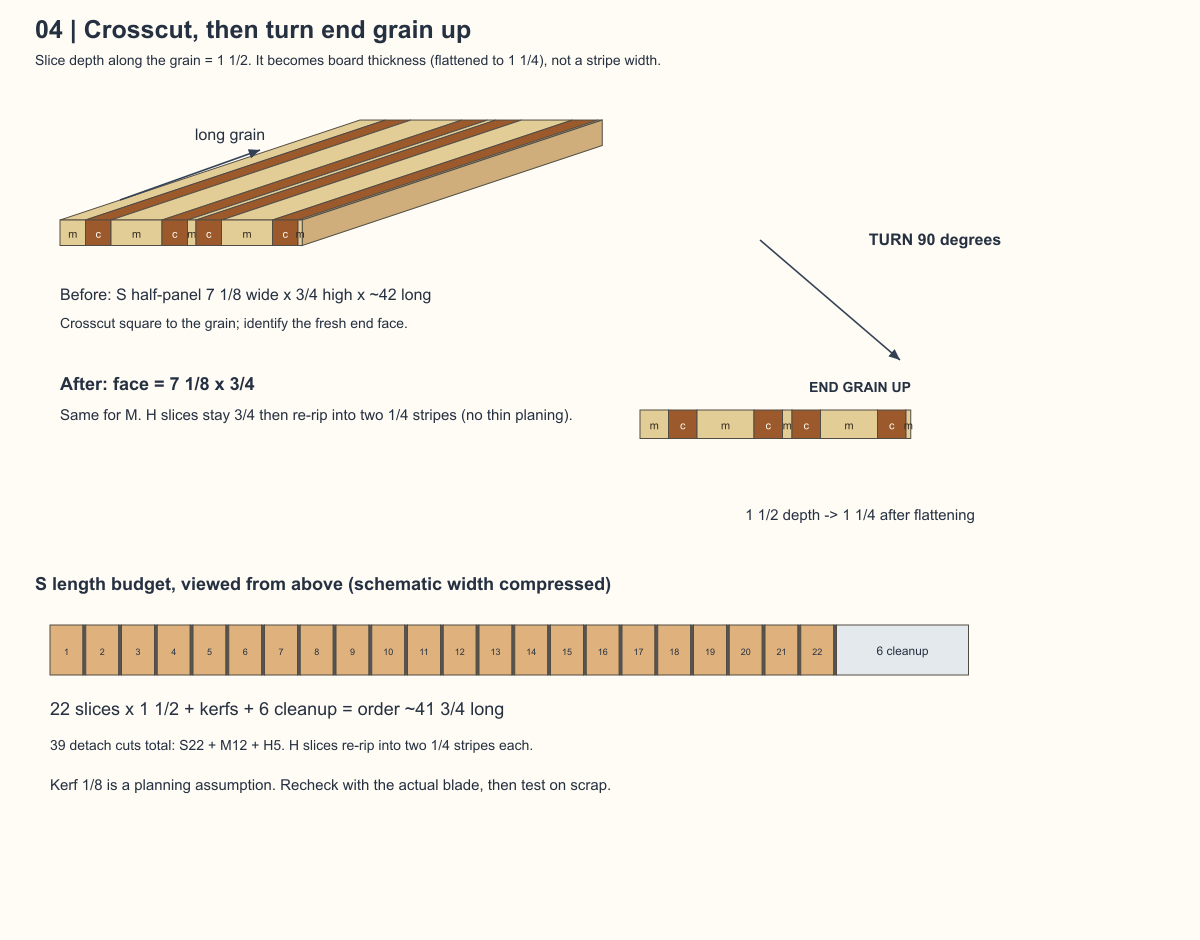
Each panel is crosscut at 1½" along the grain. Turn each slice 90° so the end grain faces up; that 1½" becomes the board's thickness (flattened to 1¼"). The ¼" thin stripes come from re-ripping the ¾"-tall walnut slices — a rip width, not a planed thickness.
Cutting the slices safely (no table saw needed)
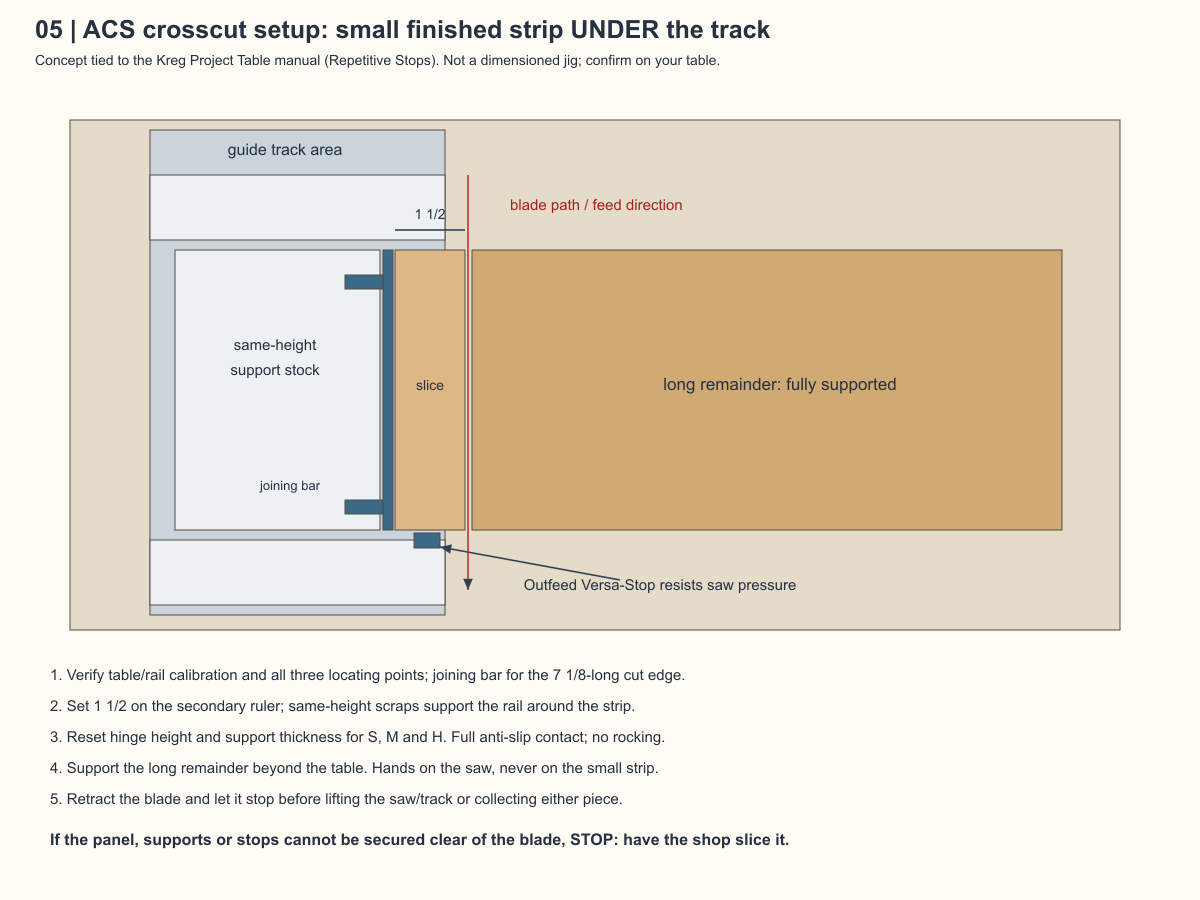
Slices are cut on a Kreg Adaptive Cutting System (track saw + project table) with the small finished strip under the track, located by the Repetitive Stops, and the long remainder fully supported. Hands stay on the saw, never on the small piece. If the setup can't be made solid, a millwork shop can cut the slices instead.
Assemble two mirrored halves
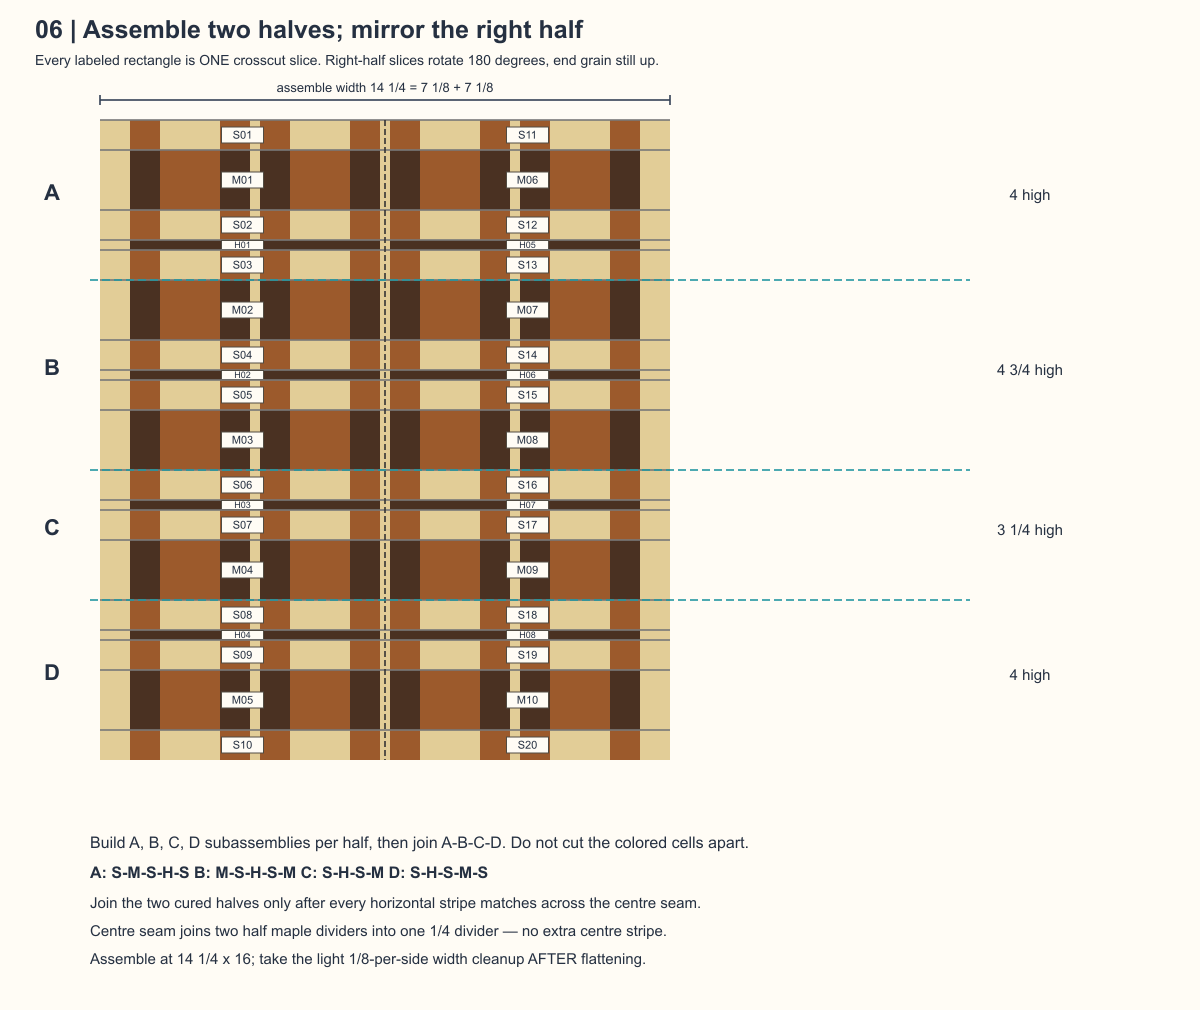
Lay out each half in subassemblies (A, B, C, D), glue those, then join them. The right half is the same slices rotated 180° — end grain still up. Join the two cured halves at the center. Keep glue off the end-grain top/bottom — squeeze-out wicks into the pores and blotches under oil.
Flatten, (optional juice groove), finish
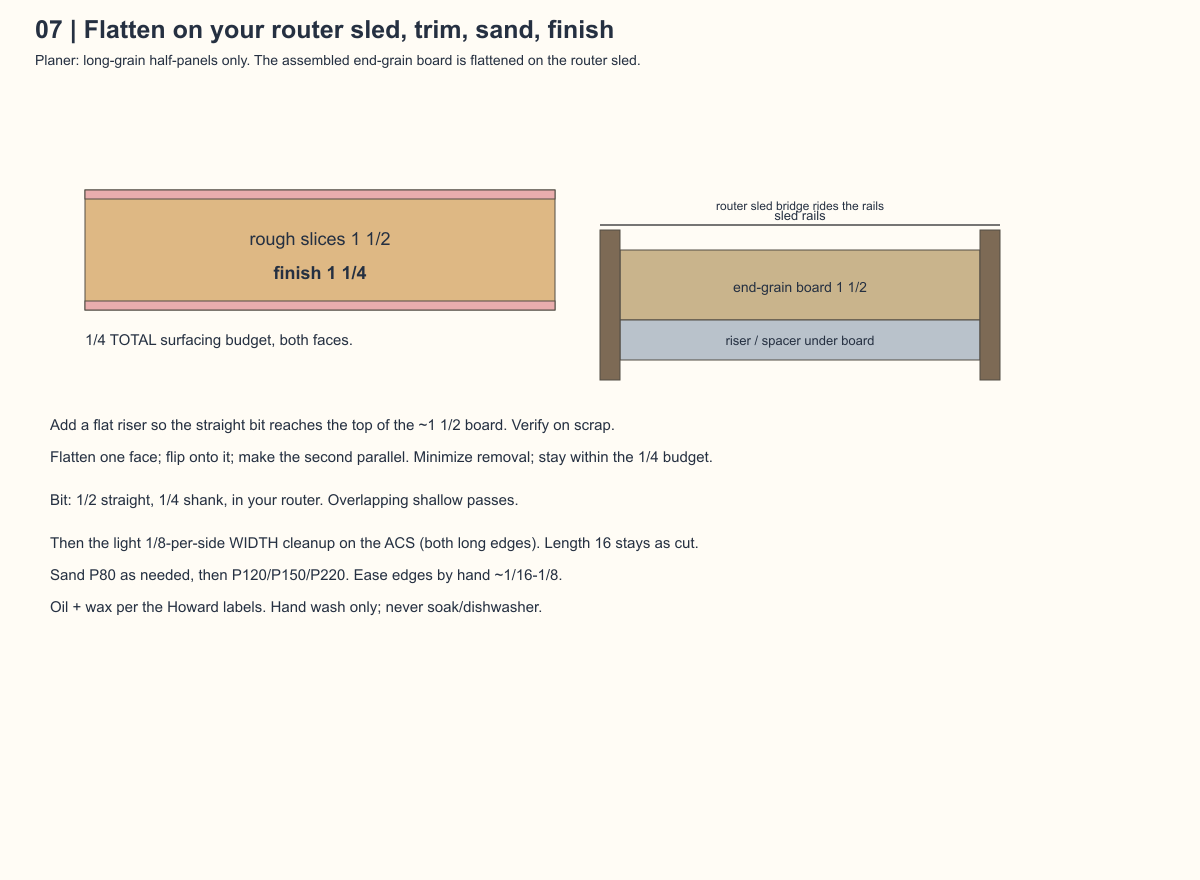
The assembled end-grain board is flattened on a router sled (with a riser, since 3"-tall rails sit above a 1½" board), not a planer. A ¼" total surfacing budget takes it to 1¼". An optional juice groove needs a core-box bit (a separate purchase). Finish with food-safe mineral oil + beeswax/conditioner — never a film finish on the cutting surface. Hand wash only; never soak or dishwash.
What to buy
In the store: use the standalone Wood Shopping Guide on your phone — it lists the exact six S3S cuts (usable width × length) and the at-the-rack flatness check.
- Wood: six cuts of 4/4 S3S — two each of cherry, walnut and brown maple (~2.2 / 1.8 / 2.2 BF, ~6.1 BF total, ~$54 before tax at MacBeath). Only ~1.9 BF ends up in the board; the rest is planing/kerf/reserve. Making two (keep one, gift one)? Double it: ~12.2 BF, ~$109. The 1½" big rows are two glued ¾" layers. The wood shopping guide has the exact six cuts and the S3S flatness check.
- Tools you likely own: lunchbox planer, track saw, router + ½" straight bit + router sled, random-orbit sander, pipe clamps, calipers.
- Worth buying: a core-box bit (for the optional juice groove), a riser for the sled, extra clamps/cauls, and a well-fitting dust mask. No table saw required.
Honest notes
- This is a multi-weekend project — most of the time is glue curing (24 hours per glue-up is the safe rule).
- The finished board is exactly 14 × 16 (built 14¼ × 16, shaved ⅛ per side on the width only, with length 16 landing on a clean cell boundary) — symmetric, with full-bleed brown-maple long edges (a ~⅝ maple border on the left and right).
- The hardest operations (precision ¼" rips and end-grain flattening) both have "send it to a shop" fallbacks, so you can build confidence without buying more machines.
Full dimensioned cut list, cut-by-cut ledger, MacBeath shopping tables, and the verification notes live in the project's working folder; this page is the readable overview.